
How to assess your readiness
for Windows 11
The following methods can be used to assess your readiness for Windows 11.
Once you have completed one of the following methods, you can upload your results to generate a personalised readiness report to share with your organisation’s decision-makers.
Hardware Readiness Script via Microsoft Intune
Note: you require a license to be able to run remediation scripts. If you don't have the required licenses, then you will need to use the output from one of the built-in Intune "Endpoint Analytics" reports instead.
- Download Microsoft's Hardware Readiness script from https://aka.ms/HWReadinessScript.
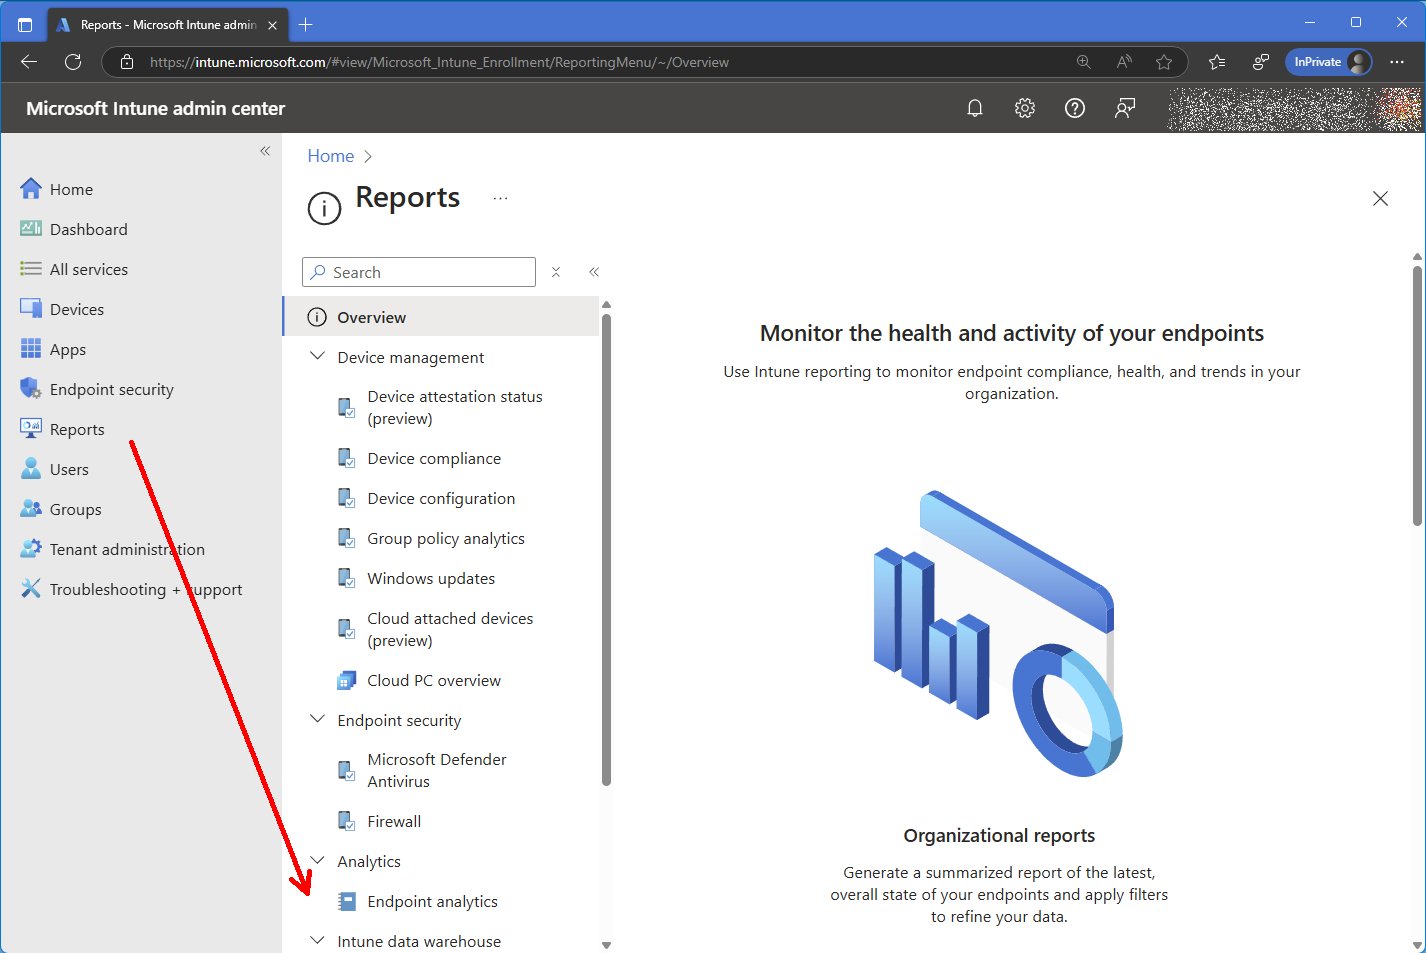
- Now, with an appropriately privileged account, navigate to the Microsoft Intune admin center and select Devices from the main menu.
Then, select Scripts and remediations from the submenu that appears.
On the Remediations tab choose the option + Create to deploy Microsoft's Hardware Readiness script.

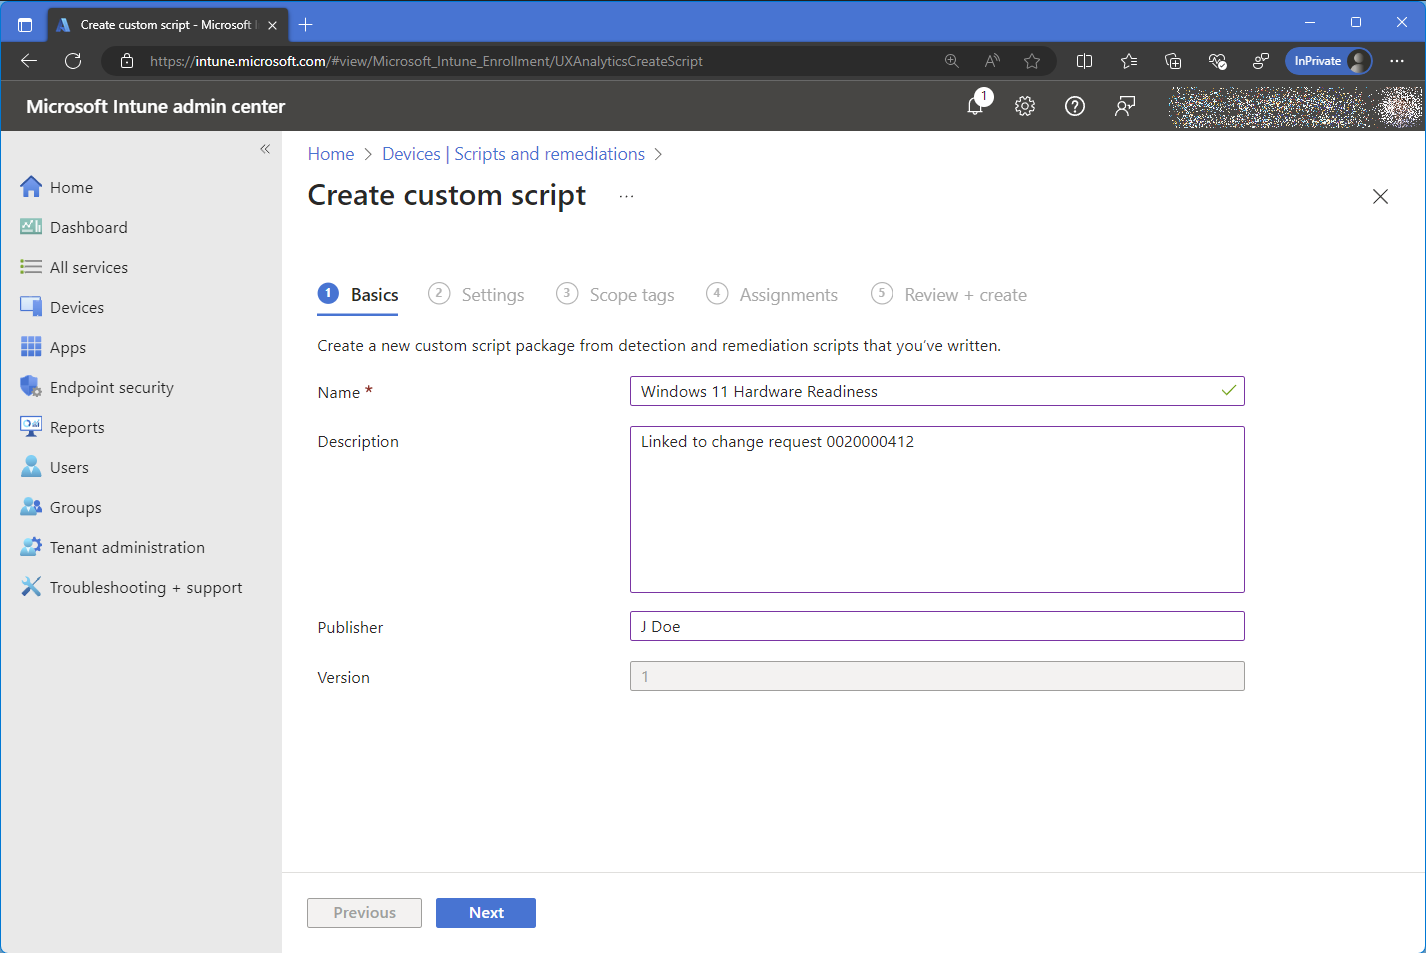
- Now, on the Basics step of the custom script deployment, input an appropriate name and description and choose Next.
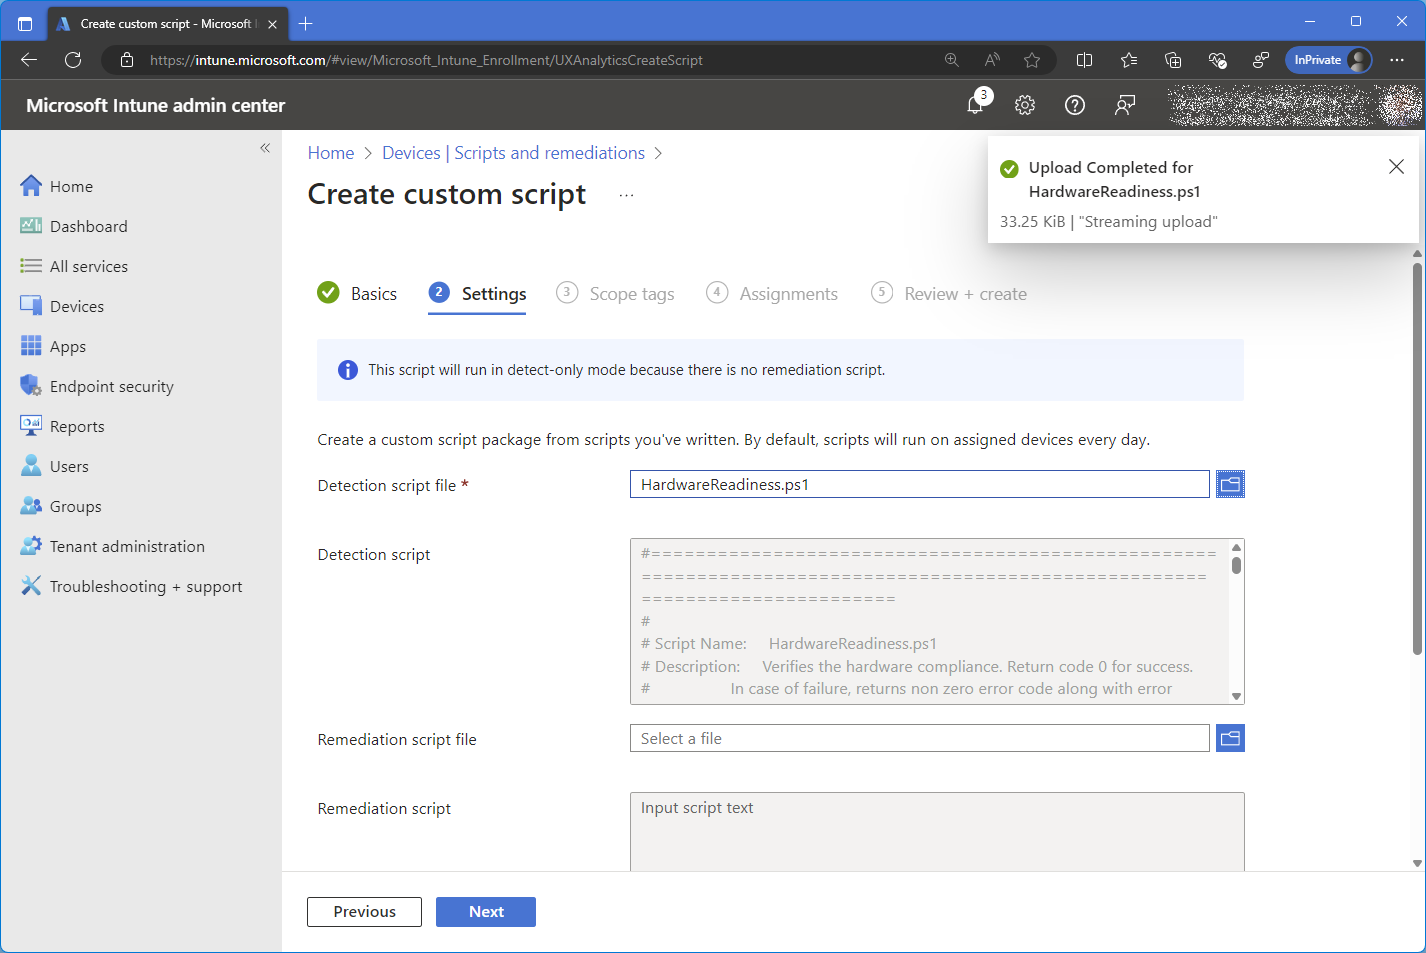
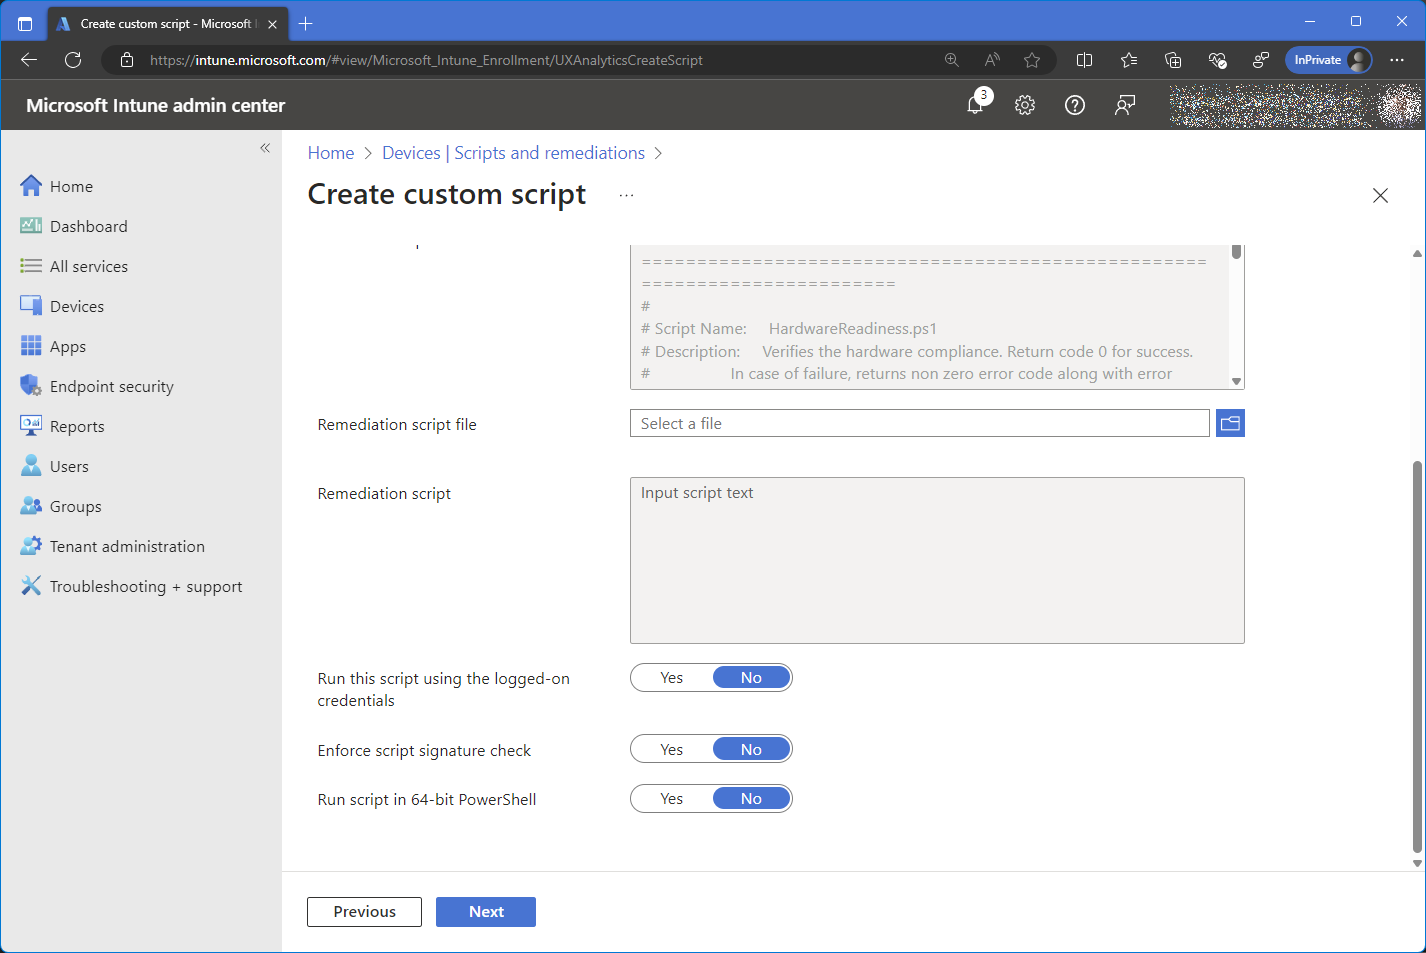
- On the Settings step of the custom script deployment, choose the folder icon next to the Detection script file to navigate to Microsoft's Hardware Readiness script downloaded earlier.
Note that you can leave all other defaults as configured on the Settings step and choose Next.
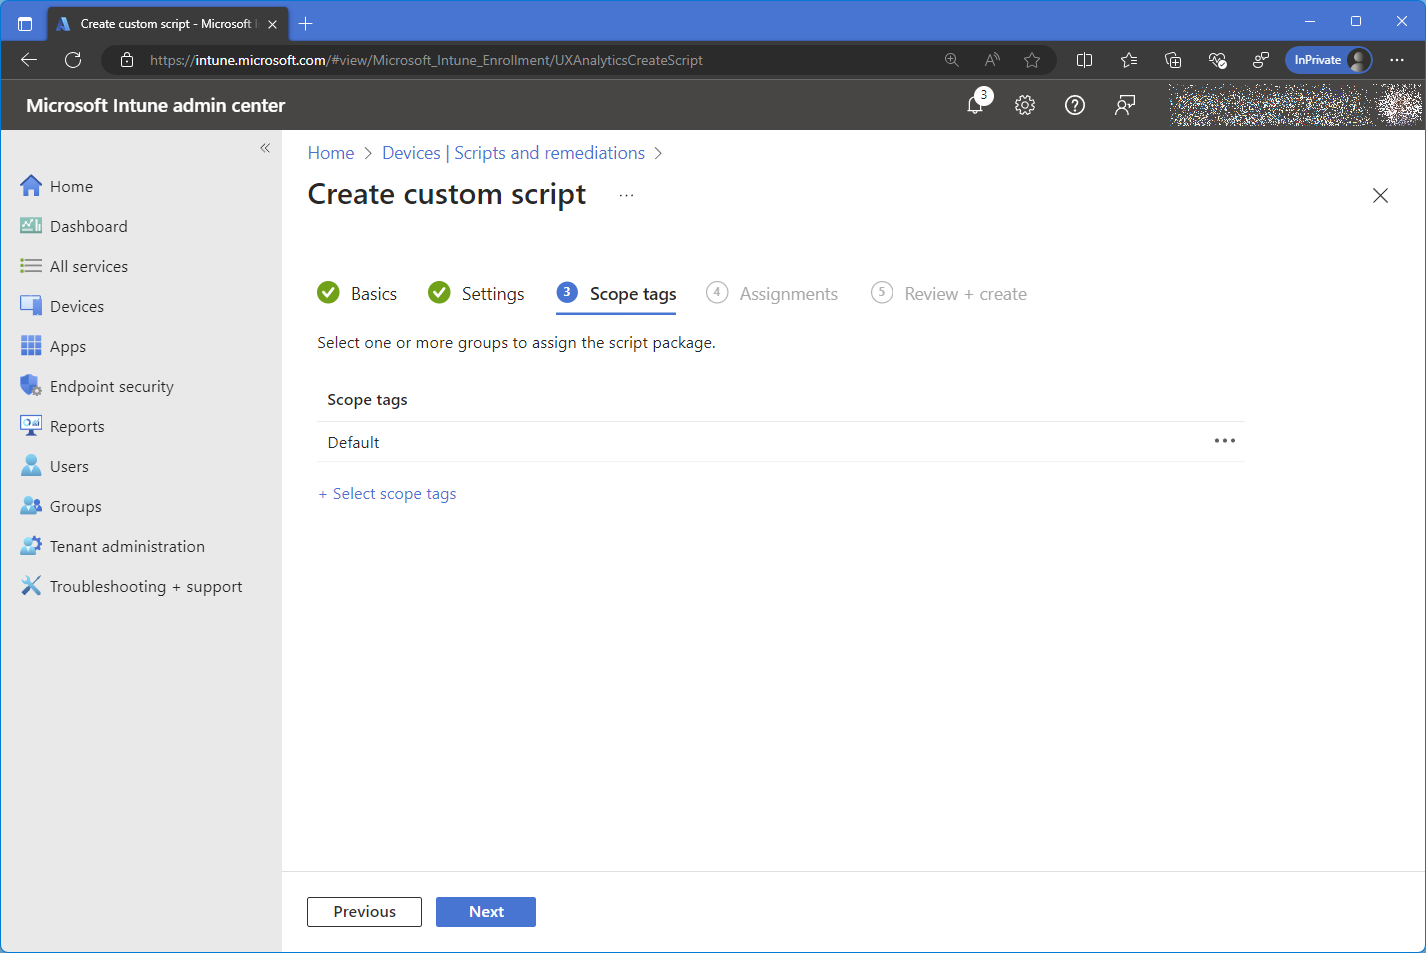
- On the Scope tags step of the custom script deployment, select any scope tags as appropriate to assign to the script package and choose Next.
Note that if you have no scope tags configured, you can leave the Default scope tag selected.
-
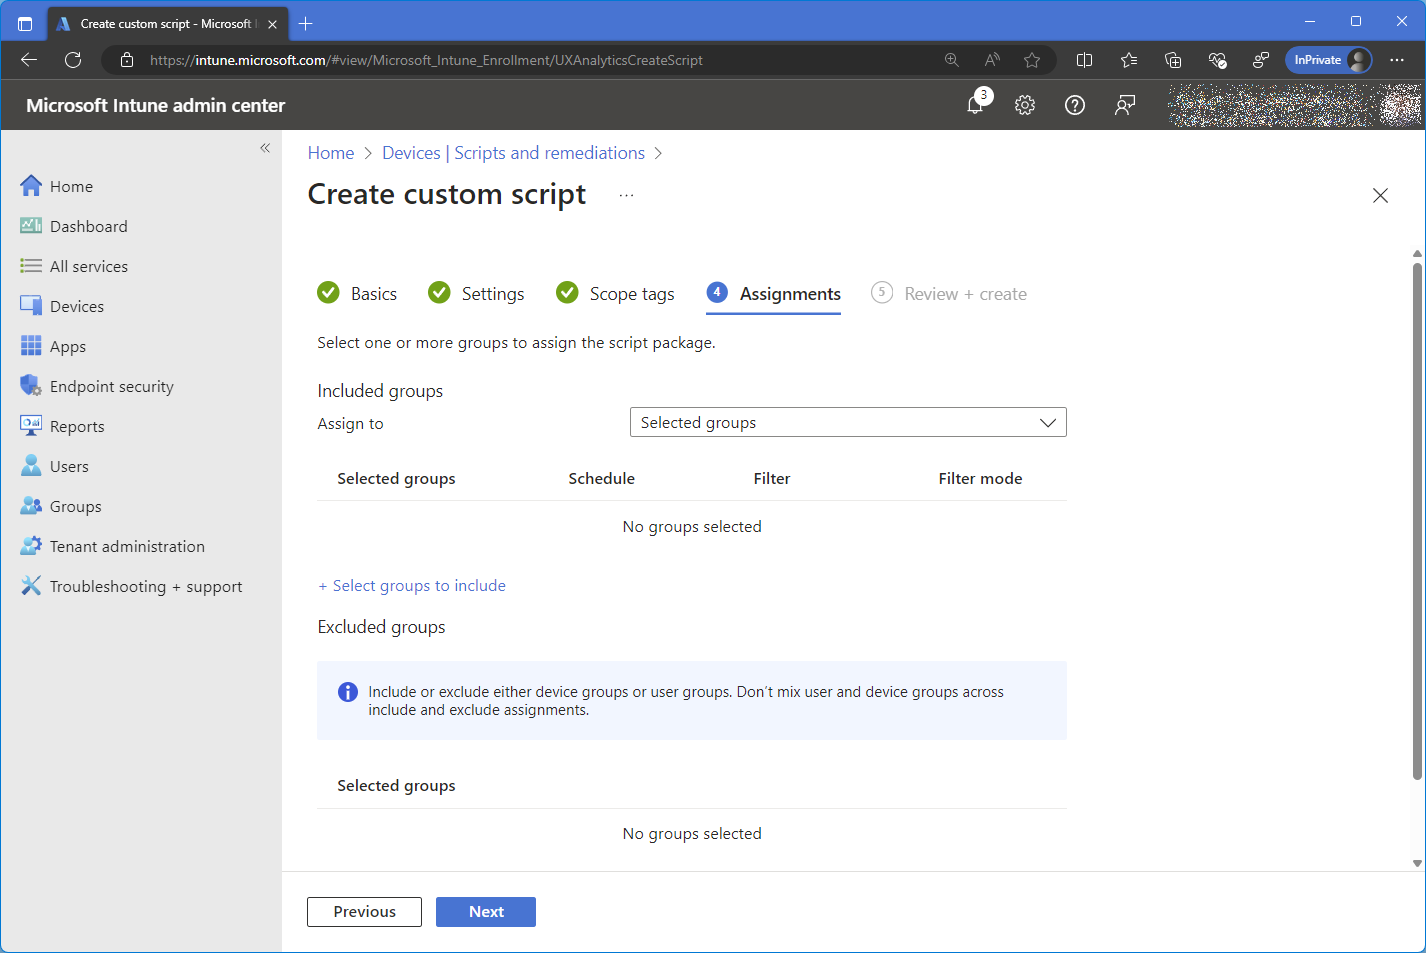
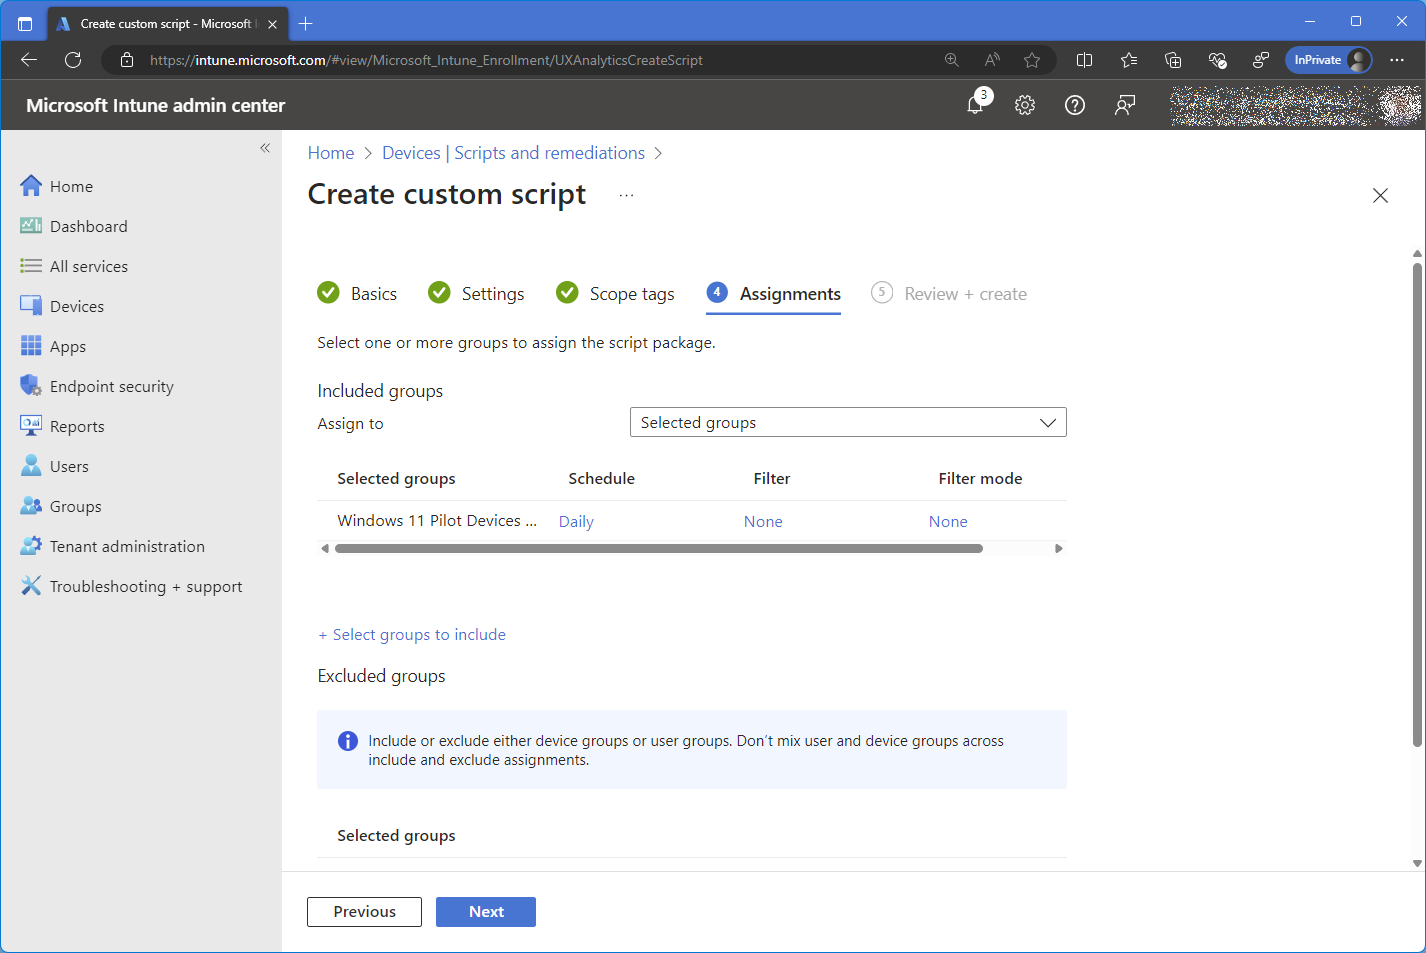
On the Assignments step of the custom script deployment, under Included groups choose + Select groups to include and select the appropriate device group(s).
Tip: choose a device group that includes Windows machines you want to check for compatibility with Windows 11.
Once you have selected the groups for the Assignments step, you can adjust the Schedule and Filter as appropriate and choose Next. You can leave the default schedule(s) and filter(s) selected.
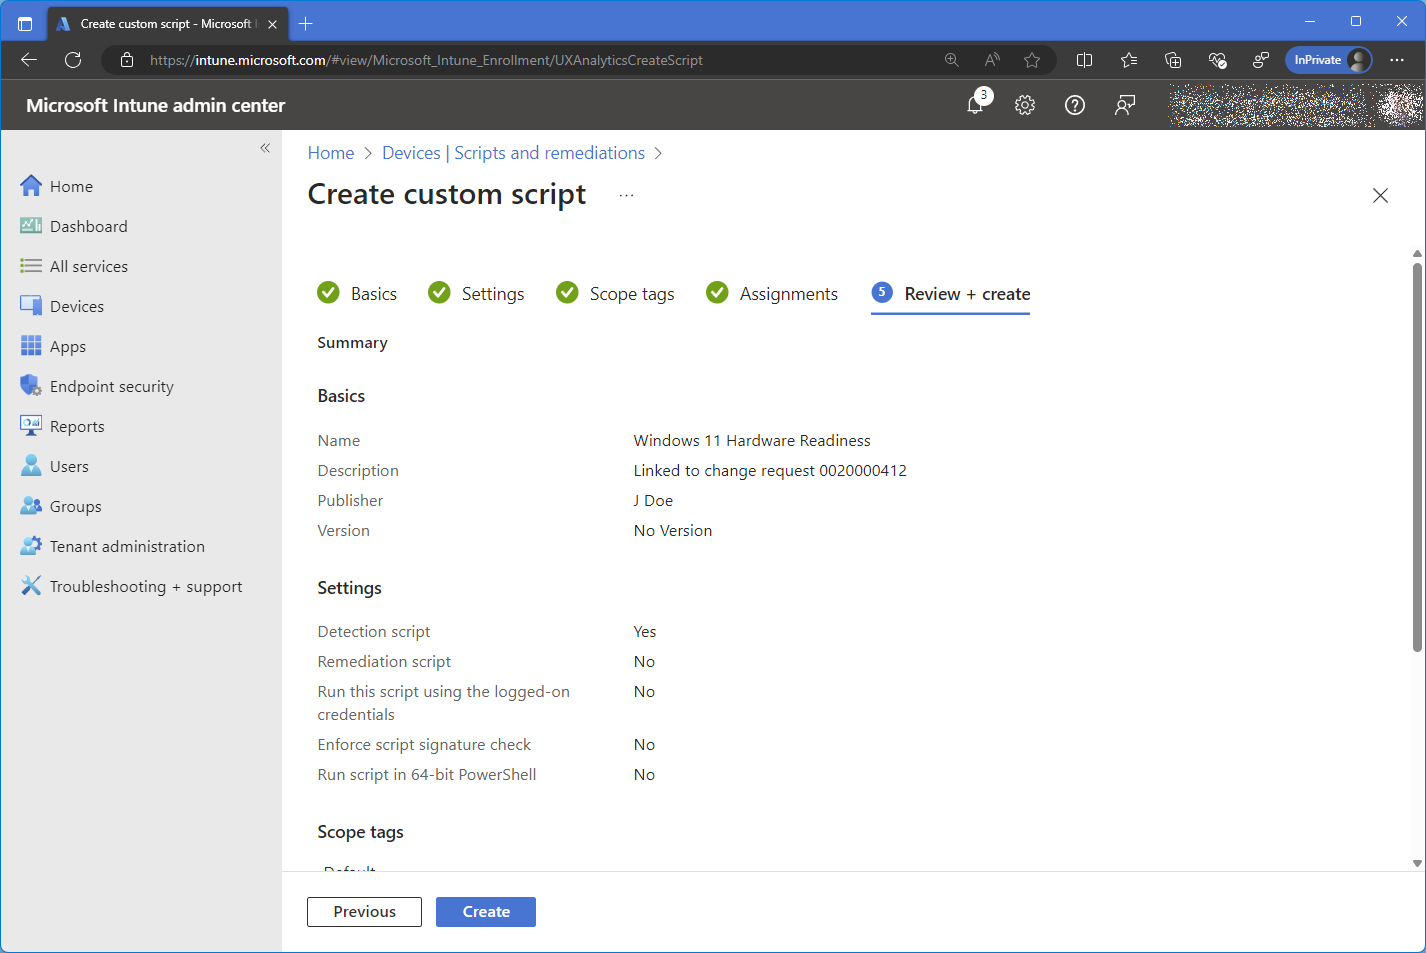
- On the Review + create step of the custom script deployment, check the details and choose Create.
-
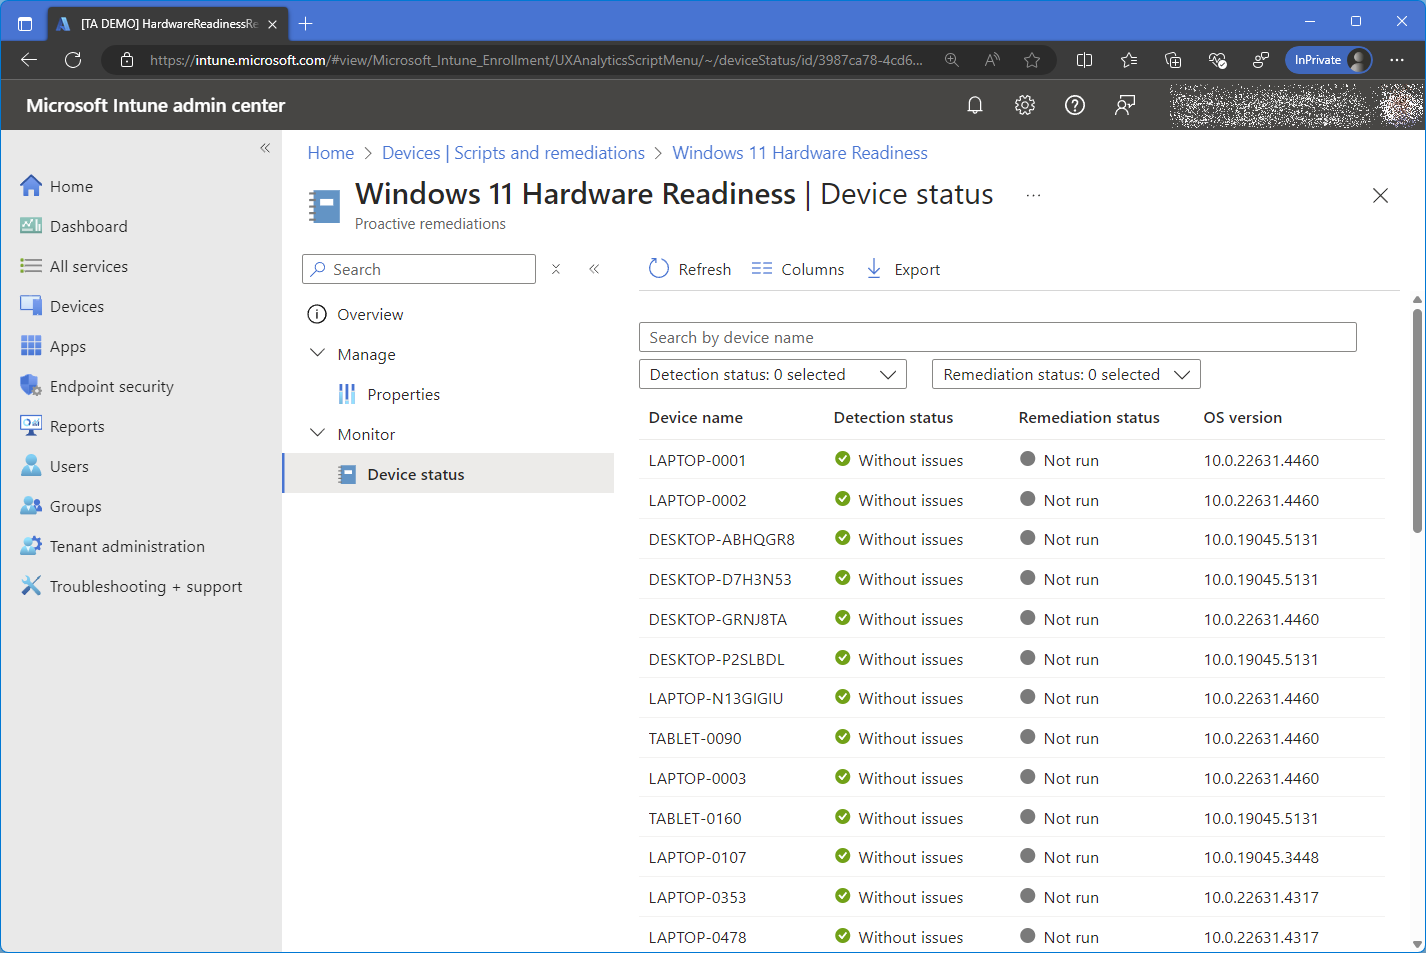
Once the script package has been deployed and results start to appear, navigate to the script and choose to view the Device status summary. Choose Export to download the results of the script deployment, which are stored in a CSV file inside a compressed ZIP archive.
Tip: You may need to come back after a few hours or days to see results.
Your exported list of devices from the Microsoft 365 Intune tenant will include personally identifiable information (PII). The Windows 11 Readiness Tool will ingest only the information from your export CSV that it needs, and will not process or store any additional data.
The required columns in the export CSV are:
- DeviceName
- OSVersion
- PreRemediationDetectionScriptOutput
If you would rather redact the export CSV before you upload to the Windows 11 Readiness Tool, please ensure you leave those three required columns intact.
- Use the CSV file with the results of the script deployment to upload to this Windows 11 Readiness Tool.
Work From Anywhere Report in Microsoft Intune
To use Endpoint analytics, your devices must be managed by Intune, co-managed, or have the Configuration Manager client version 2107 or newer with tenant attach enabled. To be included in the reports, devices must be Microsoft Entra joined or Microsoft Entra hybrid joined and must have Windows diagnostic data enabled at the "Required" level or higher.
-
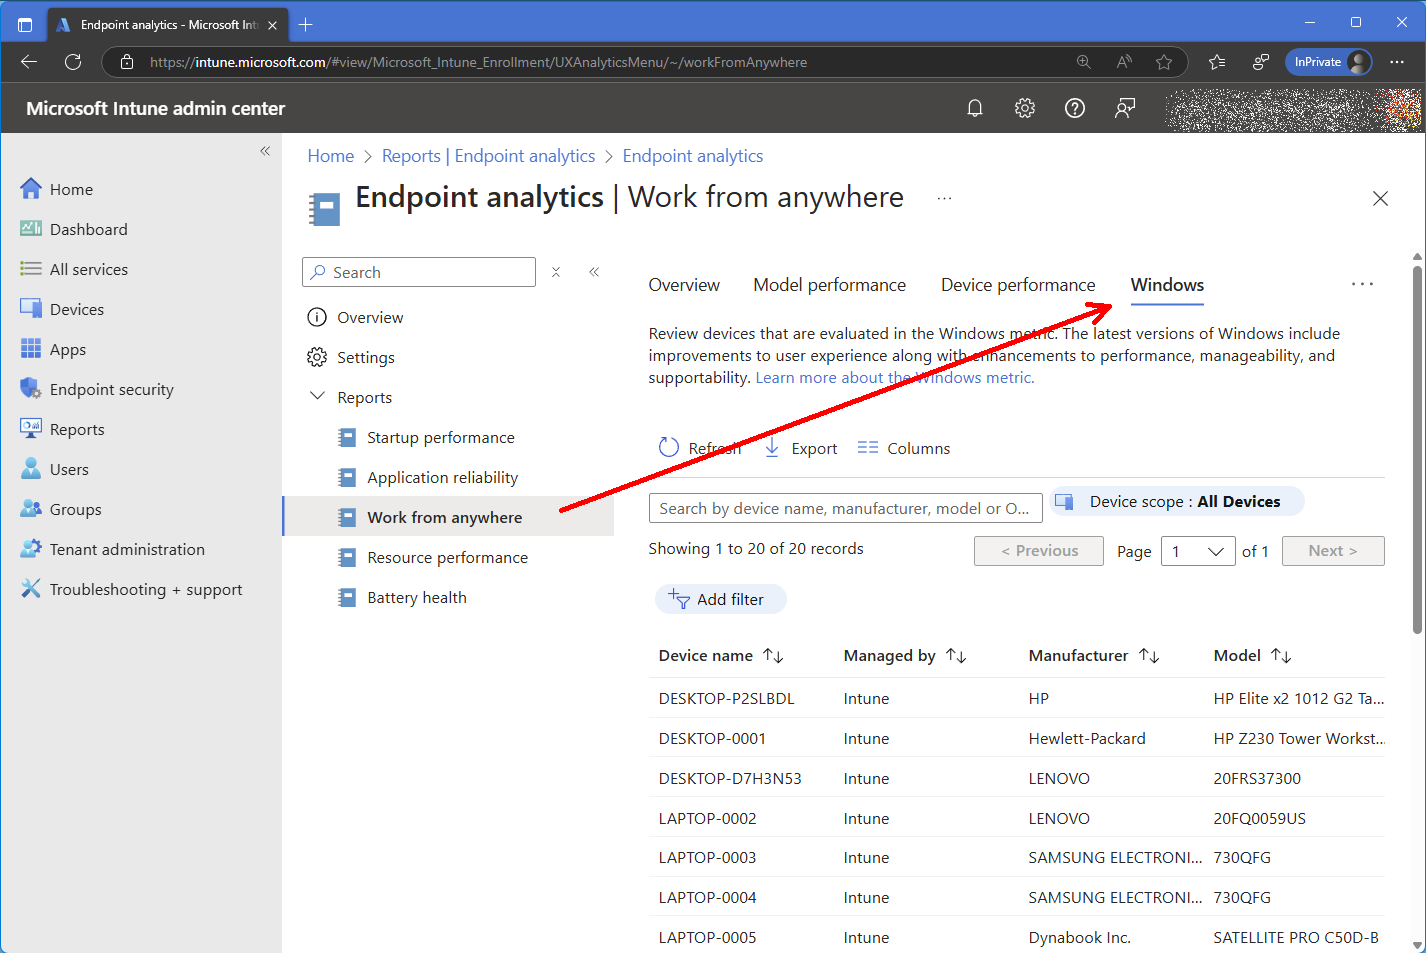
With an appropriately privileged account, navigate to the Microsoft Intune admin center and select Reports from the main menu.
Then, select Endpoint analytics from the submenu.
-
Next, select the Work from anywhere report from the submenu and choose the Windows tab of the report.
Then, choose Export to download the results of the report, which are stored in a CSV file inside a compressed ZIP archive.
Tip: You may need to come back after a few hours or days to see results.
Your exported list of devices from the Microsoft 365 Intune tenant will not include personally identifiable information (PII) but will include information that is not required. The Windows 11 Readiness Tool will process only the information from your export CSV that it needs, and will not process or store any additional data. The required columns in the export CSV are:
- DeviceName
- OSVersion
- UpgradeEligibility,
- RamCheckFailed,
- StorageCheckFailed,
- ProcessorCoreCountCheckFailed
- ProcessorSpeedCheckFailed
- TPMCheckFailed
- SecureBootCheckFailed,
- ProcessorFamilyCheckFailed
- Processor64BitCheckFailed
- OSCheckFailed
If you would rather redact the exported CSV before you upload to the Windows 11 Readiness Tool, please ensure you leave those twelve required columns intact.
-
Upload the exported CSV file to generate a report.
Windows Feature Update Device Readiness Report in Microsoft Intune
To use Intune's Windows Feature Update Device Readiness Report, your devices must be managed by Intune, co-managed, or have the Configuration Manager client version 2107 or newer with tenant attach enabled. To be included in the reports, devices have Windows diagnostic data enabled at the "Required" level or higher. Also, Windows Health Monitoring must be configured to include Windows Updates as part of the scope.
-
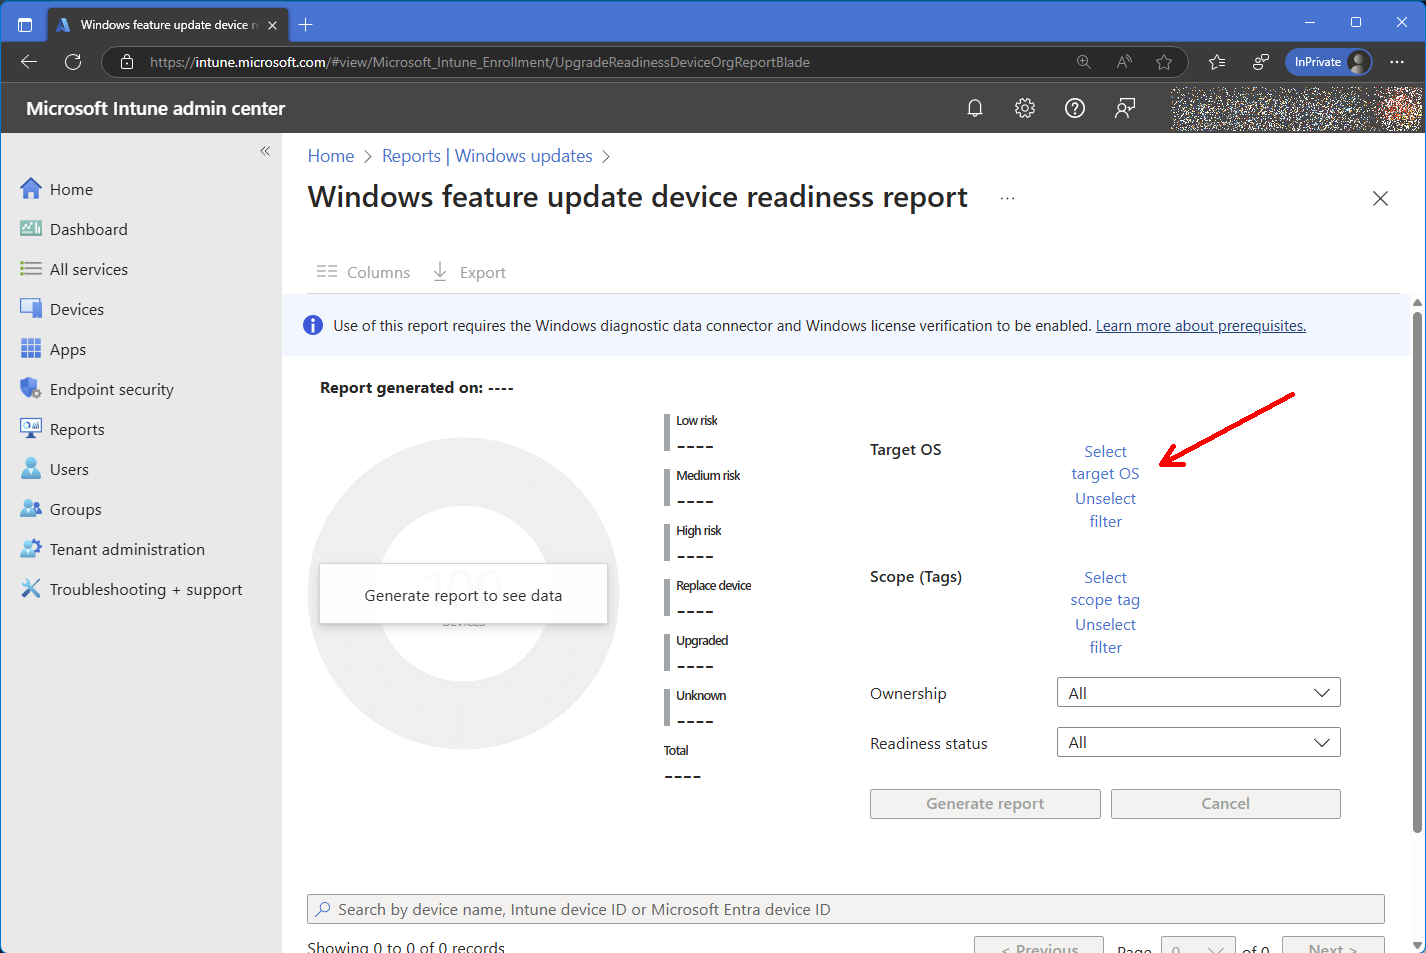
With an appropriately privileged account, navigate to the Microsoft Intune admin center and select Reports from the main menu.
Then, select Windows updates from the submenu and choose the Reports tab to select Windows Feature Update Device Readiness Report.

-
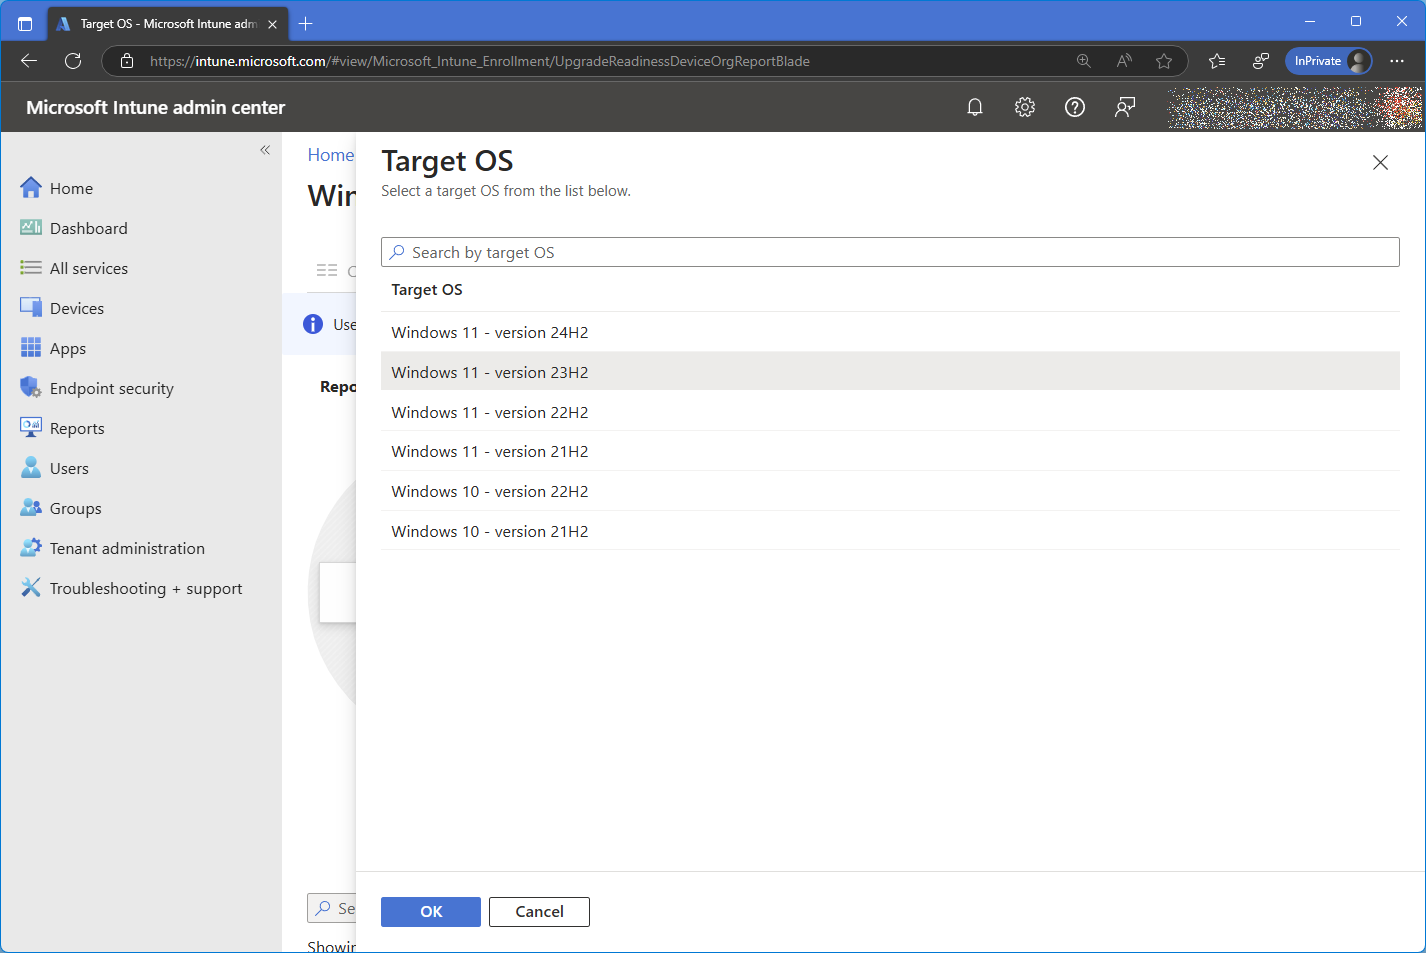
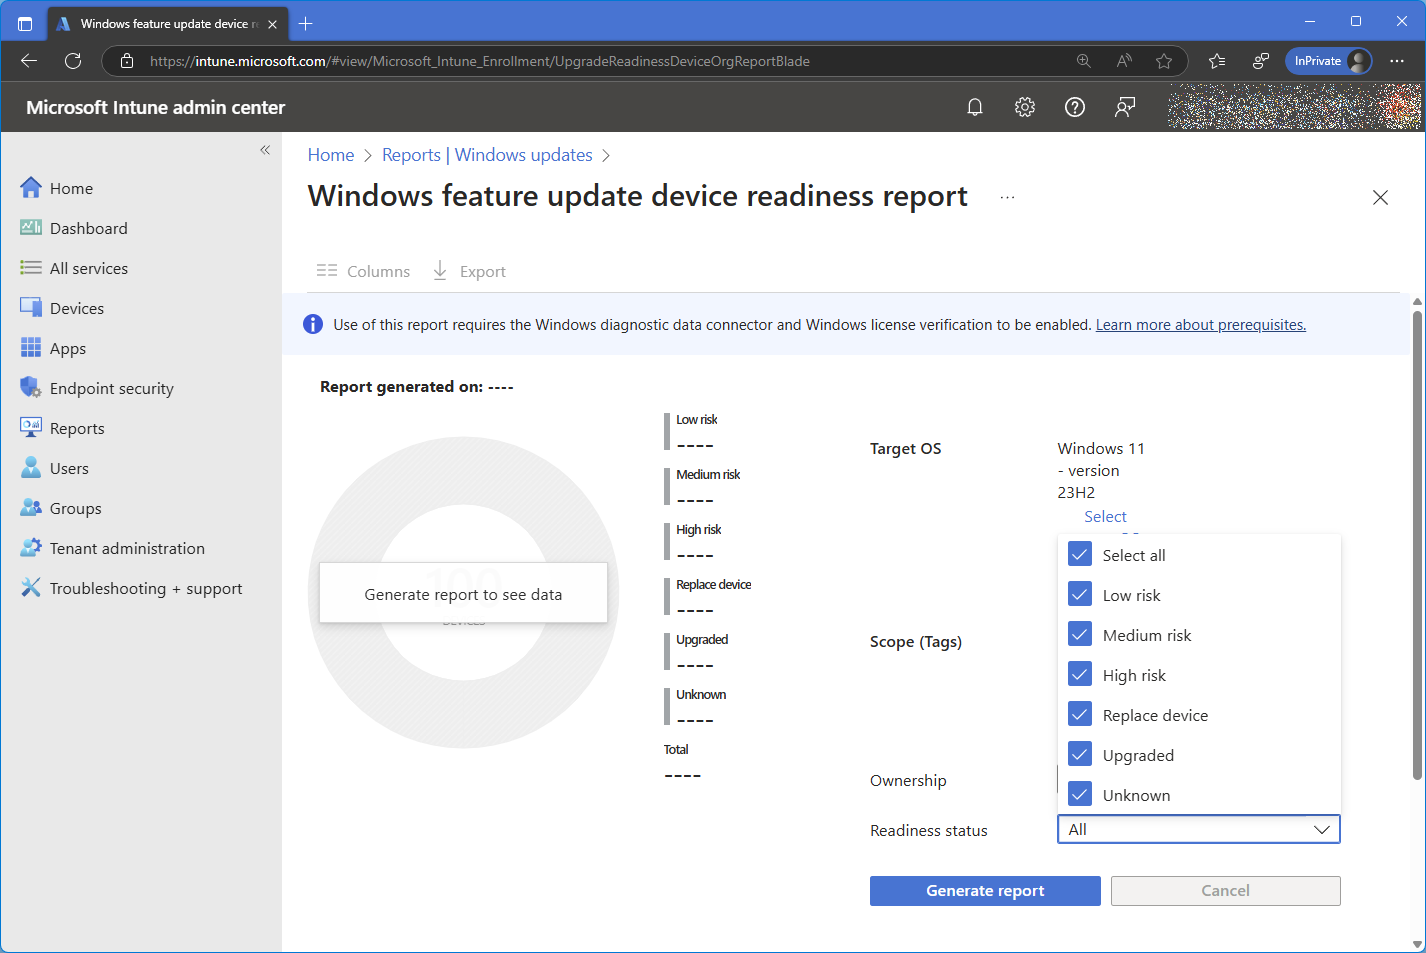
To run the report, first choose Select target OS, then select the version of Windows 11 you want to check for support (e.g. Windows 11 - version 23H2) and choose OK.
-
Choose Select scope tag and select the appropriate scope tag (e.g. Default, to include all devices) and choose OK
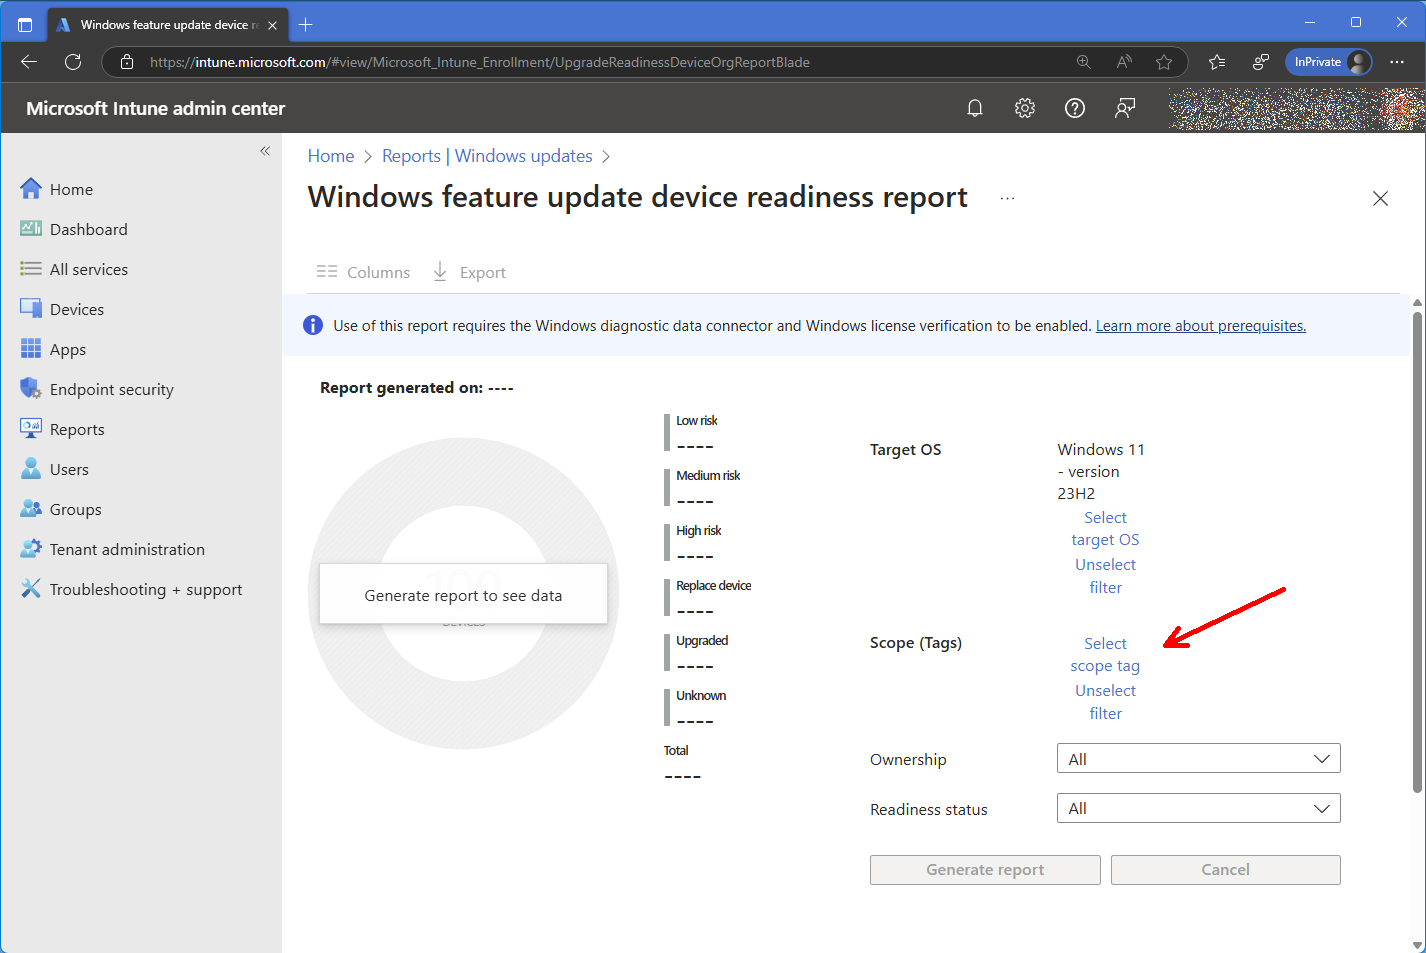
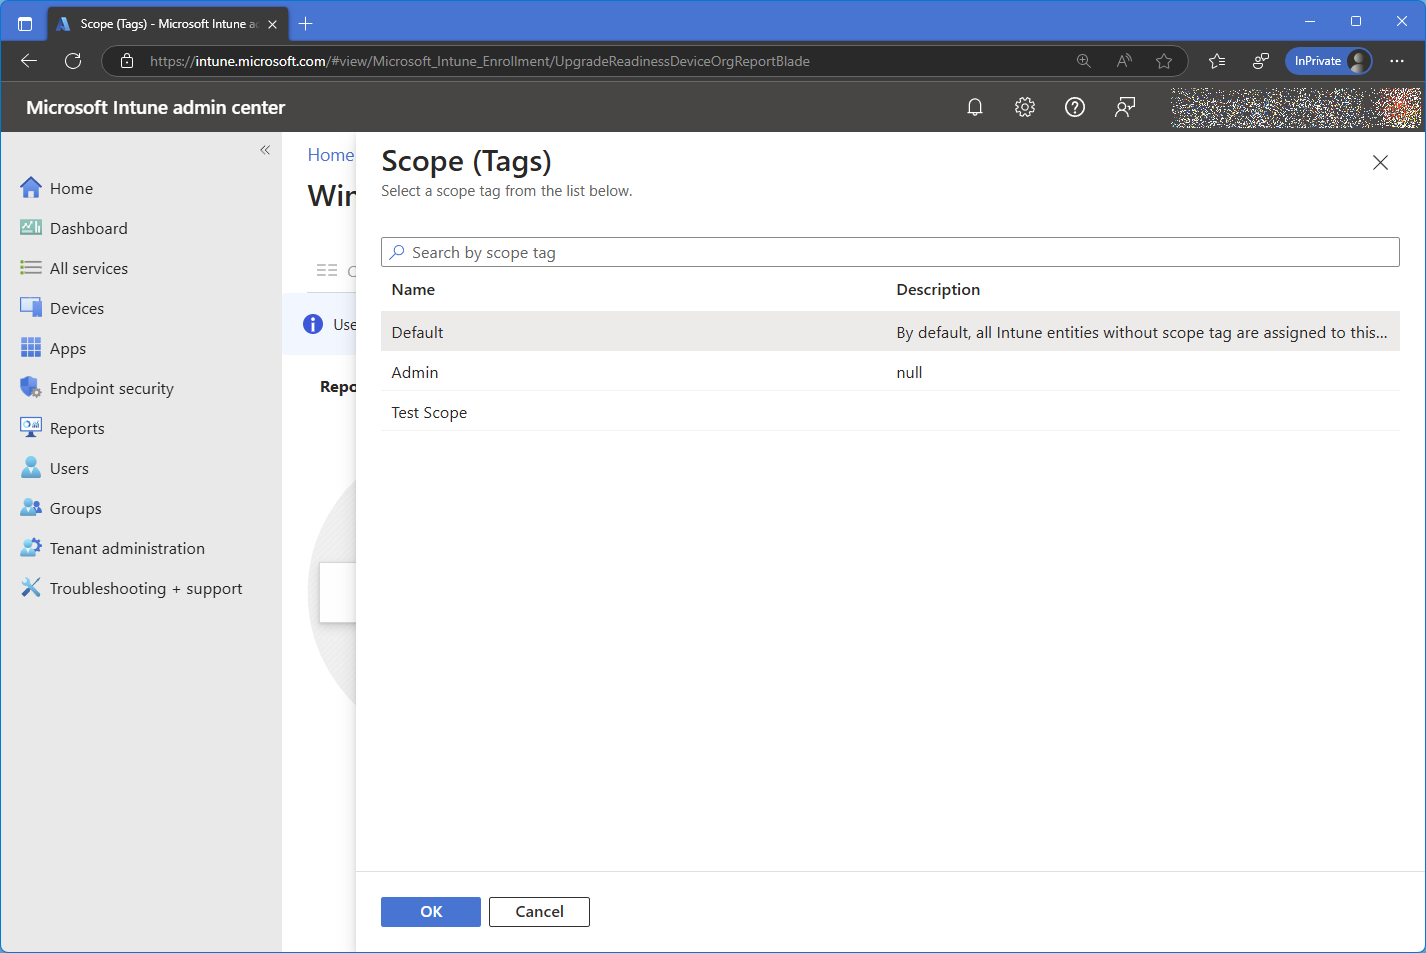
-
Check the Ownership dropdown and the Readiness status dropdown to filter out any devices you don't want to include in the report. Then, select Generate report.

-
Choose Export to download the results of the report, which are stored in a CSV file inside a compressed ZIP archive.

Your exported list of devices from the Microsoft 365 Intune tenant will not include personally identifiable information (PII) but will include information that is not required. The Windows 11 Readiness Tool will process only the information from your export CSV that it needs, and will not process or store any additional data. The required columns in the export CSV are:
- DeviceName
- OSVersion
- ReadinessStatus
- SystemRequirements
If you would rather redact the export CSV before you upload to the Windows 11 Readiness Tool, please ensure you leave those four required columns intact.
-
Upload the exported CSV file to generate a report.
Active Directory + Hardware Readiness Script
- Download the HardwareReadiness.ps1 file from https://aka.ms/hwreadinessscript and add the following code towards the end, before the line #SIG #Begin signature block
$outObject = $outObject | ConvertTo-Json -Compress
$computer = $env:COMPUTERNAME
$ComputerSearcher = New-Object DirectoryServices.DirectorySearcher
# Specify your domain name
$ComputerSearcher.SearchRoot = "LDAP://DC=WOSHUB,DC=LOC"
$ComputerSearcher.Filter = "(&(objectCategory=Computer)(CN=$Computer))"
$computerObj = [ADSI]$ComputerSearcher.FindOne().Path
$computerObj.Put( "Info", $outObject )
$computerObj.SetInfo()
- Copy the adapted HardwareReadiness.ps1 file script file to the domain controller in the folder \\[domain.local]\netlogon
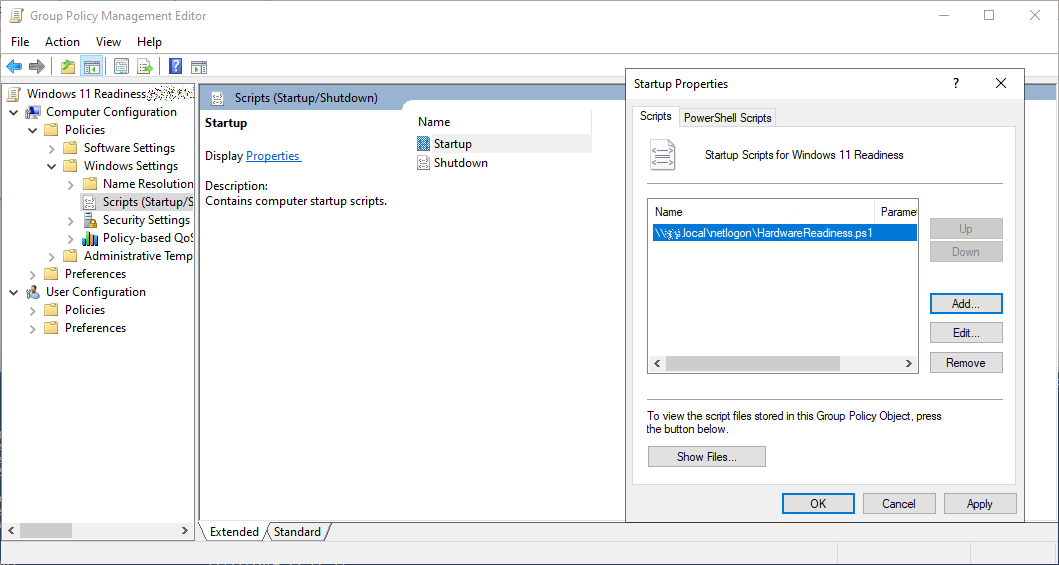
- Open the Domain Group Policy Management console (gpmc.msc), create a new group policy object linked to the domain.
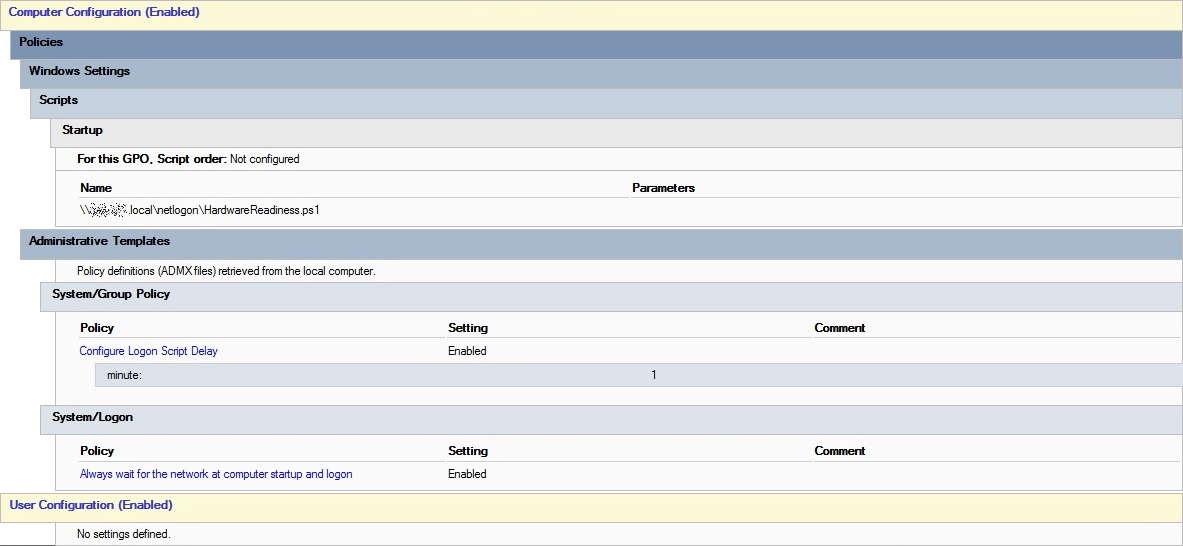
- Navigate to Computer Configuration > Policies > Windows Settings > Scripts (Startup / Shutdown) > Startup > (tab) PowerShell Scripts.
Choose Add and specify the universal naming convention (UNC) path to the HardwareReadiness.ps1 script.
-
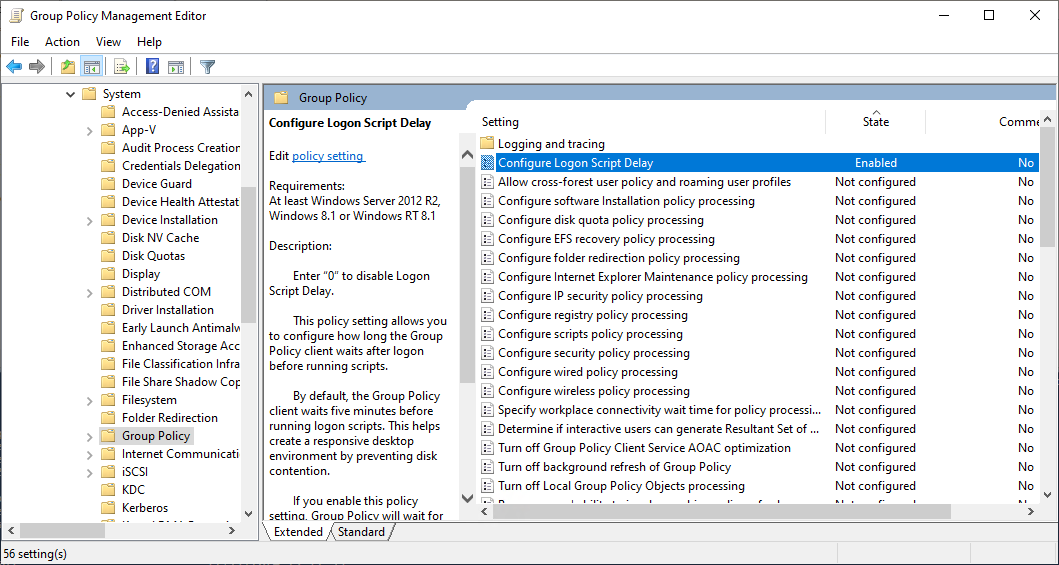
Navigate to Computer Configuration > Administrative Templates > System > Group Policy.
Enable the policy Configure Logon Script Delay and set a 1-minute script execution delay.
-
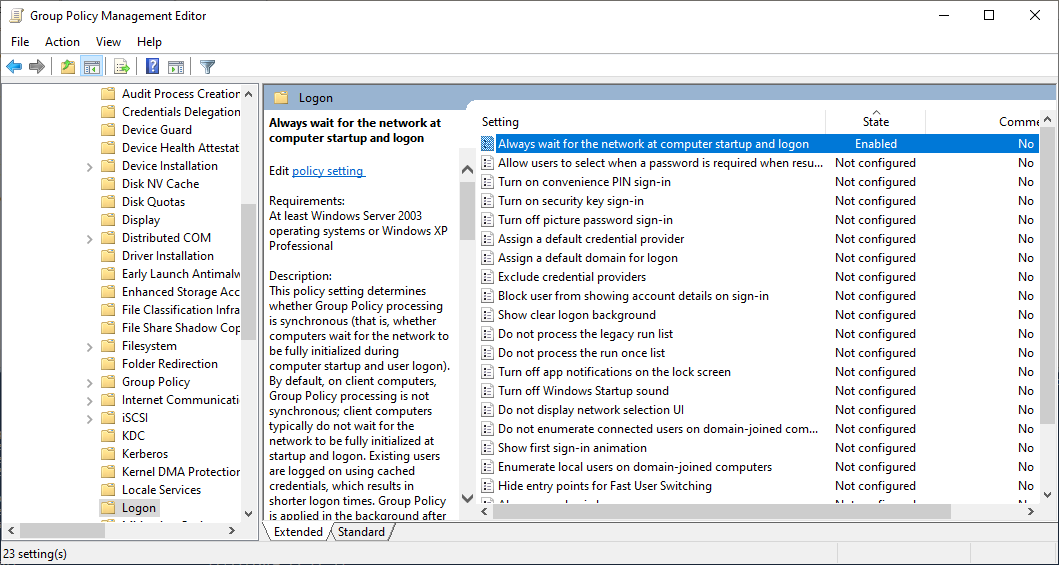
Navigate to Computer Configuration > Administrative Templates > System > Logon.
Enable the option: Always wait for the network at computer startup and logon.
-
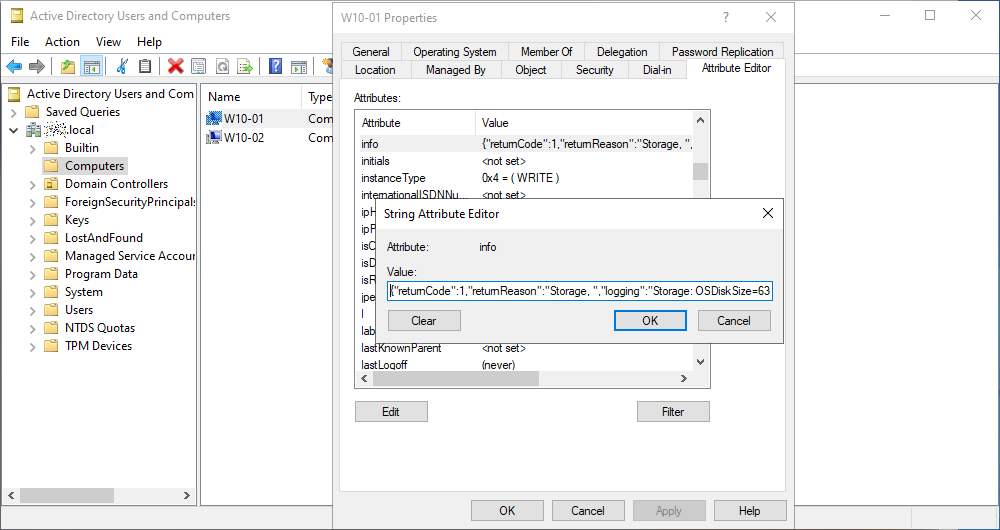
After the policy has applied and the next logon has completed on the target computer, the Windows 11 readiness details will be stored against the computer object in Active Directory.
Tip: Start the Active Directory Users and Computers console (dsa.msc) and open the computer properties. Go to the Attribute Editor tab and check that the Info parameter now contains the results of checking your computer for Windows 11 compatibility.
-
To export a list of all computers on the domain with the Hardware Readiness script output, run the following PowerShell command from the domain controller as an account with appropriate privileges (remember to amend the LDAP path to specify your domain name and export to a folder you can access):
Get-ADComputer -Filter * -SearchBase "DC=DEMO,DC=local" -Properties cn,operatingSystem,operatingSystemVersion,info | Select-Object cn,operatingSystem,operatingSystemVersion,info | Export-Csv "c:\temp\w11readiness.csv" -NoTypeInformation - Upload the exported CSV file to generate a report.
Configuration Manager / SCCM
-
To ensure your devices are reporting to SCCM, your devices must have telemetry data set to at least “1” or Basic (see Computer Configuration\Administrative Templates\Windows Components\Data Collection And Preview Builds\Allow Telemetry). Please also ensure the Microsoft Endpoint Configuration Manager (MECM) client has been upgraded to the latest version and that the “Microsoft Compatibility Appraiser” scheduled task has been configured to run (\Microsoft\Windows\Application Experience).
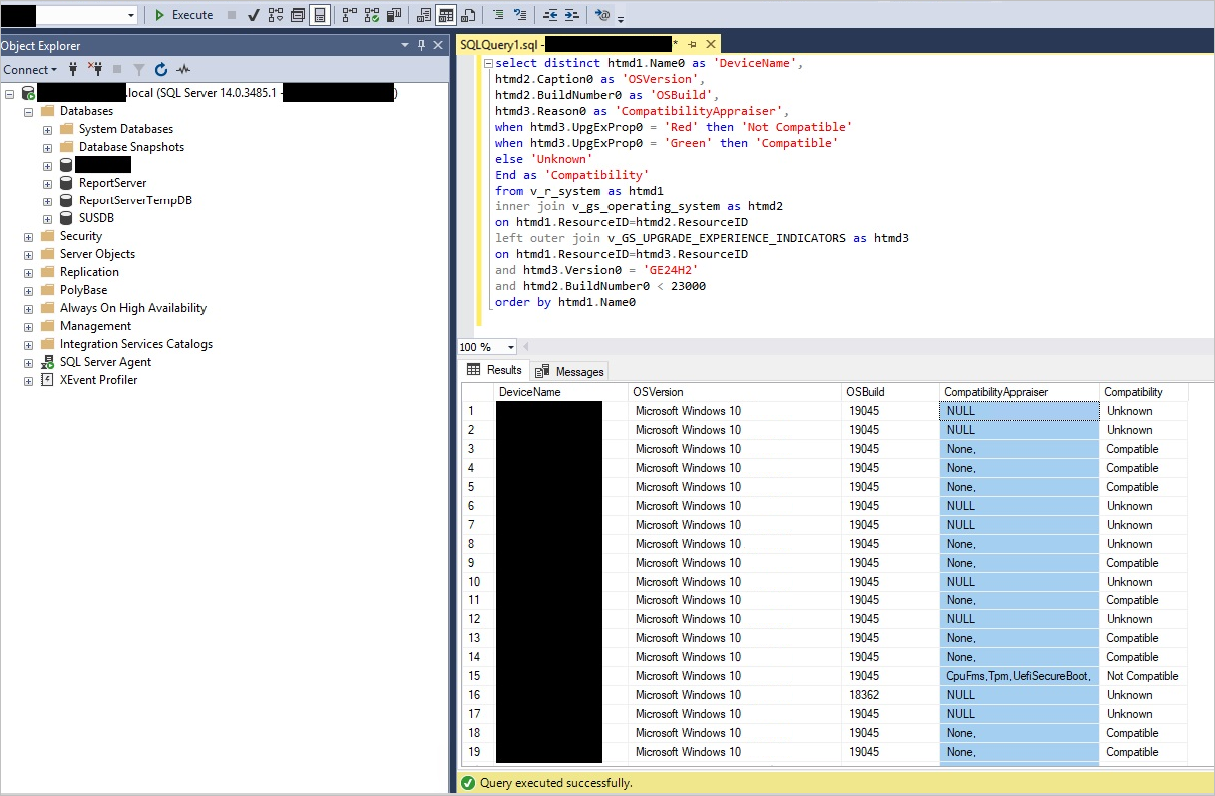
With an appropriately privileged account, open SQL Server Management Studio and connect to your Database Engine.
- Right-click on your database CM_XXX and select New Query.
-
Copy the following query:
select distinct htmd1.Name0 as 'DeviceName',
htmd2.Caption0 as 'OSVersion',
htmd2.BuildNumber0 as 'OSBuild',
htmd3.Reason0 as 'CompatibilityAppraiser',
case
when htmd3.UpgExProp0 = 'Red' then 'Not Compatible'
when htmd3.UpgExProp0 = 'Green' then 'Compatible'
else 'Unknown'
End as 'Compatibility'
from v_r_system as htmd1
inner join v_gs_operating_system as htmd2
on htmd1.ResourceID=htmd2.ResourceID
left outer join v_GS_UPGRADE_EXPERIENCE_INDICATORS as htmd3
on htmd1.ResourceID=htmd3.ResourceID
and htmd3.Version0 = 'GE24H2'
and htmd2.BuildNumber0 < 23000
order by htmd1.Name0
Then, select Execute.
-
When you are ready to export the results, click anywhere in the results grid and use the key combinations CTRL+A followed by CTRL+C to copy the results to the clipboard.
Next, open Microsoft Excel and paste the results into a new Excel workbook. From the Excel File menu choose Save a Copy, input a filename, and select CSV UTF-8 (Comma delimited) (*.csv) as the file type.
Finally, select Save to export your results to a comma-separated value (CSV) file. It is essential to keep the column headers in place.
-
Upload the CSV file to generate a report.
PC Health Check App

You can download and install the free Microsoft PC Health
Check the application to check if your device is compatible with
Windows 11. If you’re currently running Windows 10, PC Health
Check provides an eligibility check for your device to ensure it
meets the Windows 11 minimum system requirements.
You’ll get infomation on why your device is or isn’t eligible, plus info on
what you can do if your device doesn’t meet the requirements.
Related resources and guidance:
Each device needs to be tested separately. To store the results, you can start a collection on this website. You will be provided with a unique URL to share with device users. Each user will follow the instructions to test their device and enter the results into the response form. You'll see a report with all of the responses combined.
- Start a collection. You will be provided with a unique URL to share with your users.
- Share the URL with your users and ask them to follow the instructions to conduct the test and complete the simple form.
- You can see all the responses compiled in your report from the Results page.
Hardware Readiness Script
This approach involves running a script manually on each device, and exporting the result to a CSV file on a USB stick.
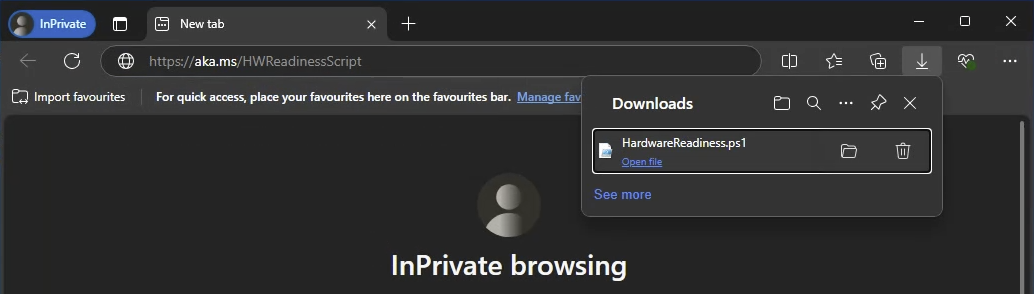
- Go to https://aka.ms/HWReadinessScript to download Microsoft's HardwareReadiness.ps1 script. Please make a note of the folder where the ps1 script has been downloaded.
- To collect the results from multiple computers, you can adapt the HardwareReadiness.ps1 script and copy it to a USB drive to run on multiple machines and collect the results into a single comma separated value (CSV) file.
To adapt the script, add the following code at the end, before the #SIG #Begin signature block text (remember to amend the path to the USB drive where you want to store the CSV file):
$cn = hostname
$os = [Environment]::OSVersion
$export = [PSCustomObject]@{
  DeviceName = $cn
  OSVersion = $os
  Result = $outObject | ConvertTo-Json -Compress
}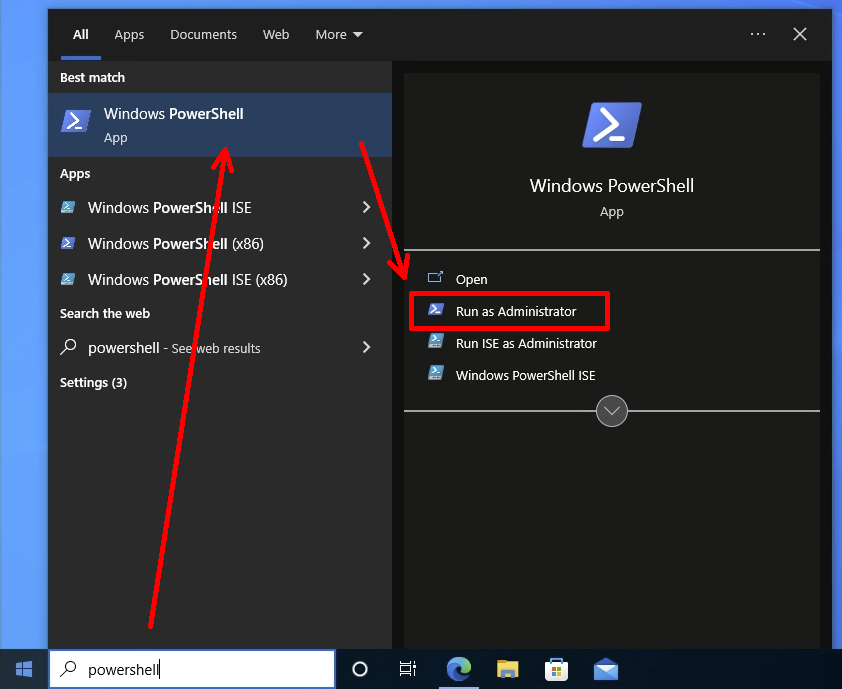
$export | Export-Csv "d:\w11readiness.csv" -NoTypeInformation -Append - From the Windows Start menu, search for "powershell" and select the option Run as Administrator for the Windows PowerShell app.
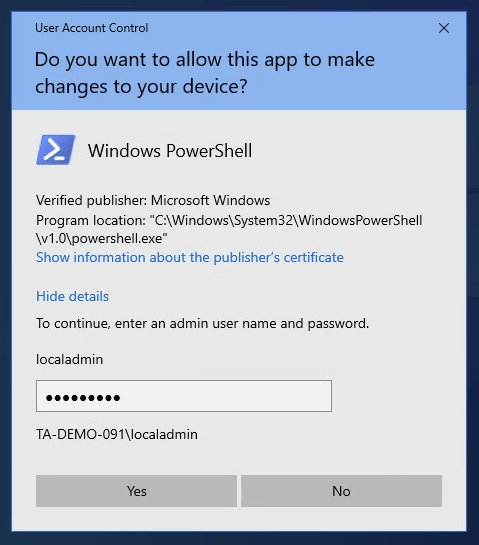
Note, you may see a User Account Control window asking "Do you want to allow this app to make changes to your device" and prompting for credentials of a device administrator. You will need to input appropriate credentials and select Yes to continue.
-
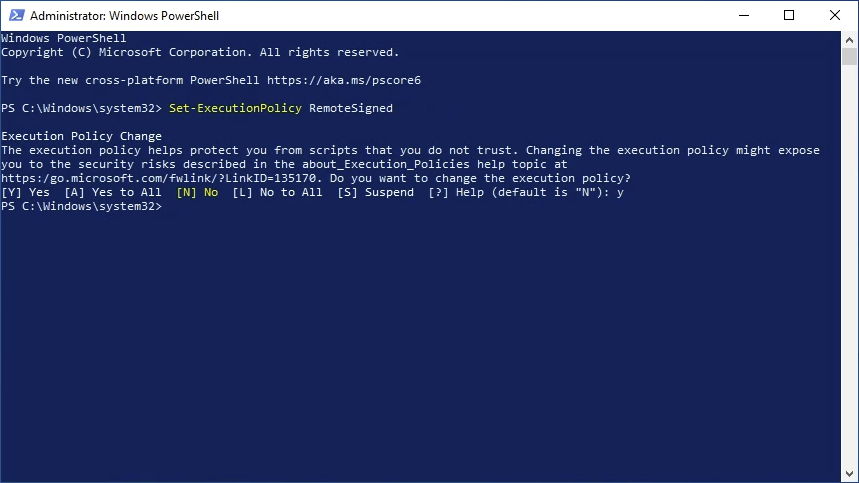
Note the title of the window shows "Administrator: Windows PowerShell".
At the PowerShell prompt type the following and press [Enter] on the keyboard.Set-ExecutionPolicy RemoteSigned
If asked to confirm you want to change the execution policy, type y and press [Enter] to confirm.
-
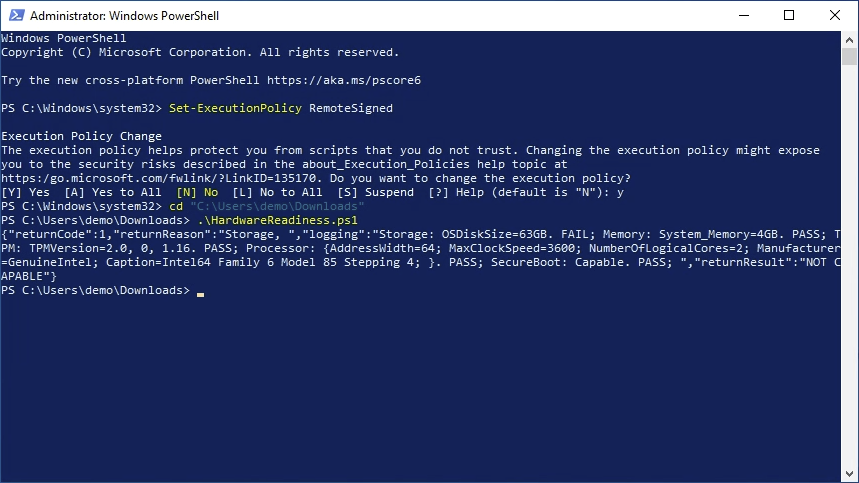
Type cd [space] and in double-quotes type the path to the folder where the HardwareReadiness.ps1 script has been downloaded and press [Enter] on the keyboard.
In this example:cd "C:\Users\demo\Downloads"
(the folder path on your device may be different).
Next, type.\HardwareReadiness.ps1
to run the downloaded script from the folder.
-
Upload the exported CSV file to generate a report.